Saturday, December 14, 2013

MMM Good!!!


Seafood Corn Chowder

So the storm has finally reached the Philly area and she is a nasty one!  Every type of precipitation known to the earth has hit here in the last 12 hours.  Snow, check!  Sleet, check!  Freezing rain, check!  *Yes, there is a difference between sleet and freezing rain!*  Rain, check and CHECK!!!  It is not a fit night outside for man nor beast!!

So what to do on a Saturday night like this for dinner?  By request from my husband, Seafood Corn Chowder.  MMM Good!!!  Trust me, you will not be disappointed in this one!

Now, the ingredients for this may be a little pricey so you might want to save it for a special occasion like New Year's Eve or Christmas Day or whatever.  But this is so good!! 

Seafood Corn Chowder

Ingredients:
4 oz. butter
½ Cup Celery sliced thin or diced small
¼ Cup Onion diced small
2 to 3 Cloves Garlic sliced thin
4 Cups Vegetable stock
1 Cup Heavy Cream
1 Cup Skim Milk
5 Tablespoons Corn Starch
1 lb. Crab Meat
1 lb. Sea Scallops cut into small pieces
½ lb. Shrimp tails off cooked, shelled and deveined
3 to 4 Red Bliss Potatoes cut in to small cubes
1 Cup Frozen Corn
1 ½ Tablespoons Bay Seasoning
1 teaspoon Kosher Salt
Fresh Cracked Black Pepper to Taste

Directions:
Melt butter in a large dutch oven over high heat.  Add in celery and sauté for about 2 minutes until soft.  Next add in onions and garlic, sauté until onions are soft and slightly brown, about 2 to 3 minutes.  Now add in vegetable stock, crab, shrimp and potatoes; bring to a boil.  Add in potatoes, cream, milk and bring to a boil. 
Reduce heat to low and add Kosher salt, Black pepper, frozen corn, Bay Seasoning, and sift in corn starch.  Allow to simmer for about 1 hour.   

Serves 6 to 8.

Monday, December 9, 2013

Let It Snow!

I was able to attend my first Eagles game in probably a decade yesterday.  Yes, the "Snow Bowl"!  So, in honor of that, here are tons of crafts that I have done that are snow related.

Dollar store Christmas balls, some spray glue and Epsom salts will get you these great frosted ornaments.

Now take the Epsom Salts and a funnel and fill a glass Christmas ball about half full.  Then cut some green craft foam in the shape of holly leaves.  Grab some red beads or small foam balls and hot glue them all together and slip then in to the glass ball and you have Holly In The Snow!

Using some inspiration from a post on Pinterest (you can see that post here), I decided to make these cute little refrigerator magnets.  Get some tea lights from the Dollar Store.  Using a Sharpie, draw a snowman face on them using the flame as the nose.  Also pick up some gloves at the Dollar Store.  Cut the fingers off of the gloves and roll them up so they look like hats.  Carefully hot glue them on the snowmen.  At a small strip of magnetic tape on the back and you have an adorable refrigerator magnet!


Getting some inspiration from, where else, Pinterest (you can see the post here), I decided to make these adorable little snowmen!  The original post used Hershey's Nuggets, but I wasn't able to get any of those.  Using candy about the size of Hershey's Nuggets, I used some Krackel candies that were the same size, cut card stock in strips that are 1 inch by 3 inches and draw snowman faces on them close to the bottom edges.  Then wrap the candies and attach with double sided tape.  Now, using the same Dollar Store gloves, cut off the fingers of gloves and roll them to look like hats for your snowmen.  

There you go!  A great way to spend your next Snow Day!

Friday, December 6, 2013

Kids' Christmas Portraits


I just love this shot of my grandson!  Now, you might say "Yeah, sure!  You are a professional photographer with a home studio".  True, but I have some tips to help you get some great shots too,

First, set up an area for your photos.  It can be your living room.  I just used my fireplace to do a photo shoot for a family.  If you don't have a great area as a backdrop, try going outside and using a great pine tree or waiting until your Christmas tree is up and use that as a backdrop. It should be just a minor part of the photo anyway, so don't stress over it.  

Go to the dollar store and get some props/bribes.  Candy canes, artificial snowflakes, candy, fancy gift boxes, etc.  Then stack up the boxes (even wrap just some plain boxes and add some pretty  ribbon, these won't be opened; mine have hearts on one side to do dual purpose for Valentine's day photos).  Put some candy canes in some of the boxes, candy in others, lay the snowflakes on the floor.

Get some old toys, iconic things that are timeless (an old wood train, a jack-in-the-box, a xylophone, wood blocks, a baby doll) and let them just play with them.

Now get on the floor.  Yes, YOU!  Get down on the floor with the kids.  Let them open the boxes once you have the camera ready and focused on them.  Then shoot away!!!  Take a zillion photos!!!  Remember you only need a few photos, but if you take hundreds (yes I actually do this) you will come up with several winners.  If you camera has a "continuous shoot" setting, put that on and hold down the shutter release.  Here are some examples:


Yeah, okay, my model is pretty amazing!  He is an extremely cooperative model!  I have been doing photo shoots with him since birth.  He's very comfortable in front of the camera with me and will do anything I ask him to do!  Amazing!

I hope these tips help you get some wonderful shots of your little ones.  If you try them and they help you, let me know.

 http://www.rocktheshotforum.com/wp-content/Banners/banner_125px.jpg

 www.rocktheshotforum.com/

Tuesday, December 3, 2013

Gold Leaf Star Ornament


I saw this saying when I was at Michael's and I just loved it!  So I bought this blank ceramic star ornament and this gold leafing paint pen.


A quick and easy ornament was born!


I think it's pretty great!  Hope you like it!

Monday, December 2, 2013

Santa Hats


These little hats are made completely of things you can get at the Dollar Tree!  I picked up two small styro foam cones, a package of foam craft paper with sparkles and some garland.  Add in a couple of hot glue sticks and you have these cute little Santa Hats!  Easy peasy!!!  Aren't they cute?


This is a fun craft for older kids that can handle a hot glue gun.  Girl Scout troops or even Boy Scout troops would love to make these.  Combine watching the movie Elf with making these and I think you have a winner!  Great for your family holiday party kids' craft.


I did cut the foam craft paper on an angle to match the cones and used 2 pieces of craft paper per cone.  I didn't put any paper on the bottoms, but I did wrap it over the tops.  The two pieces overlap (if you do it right which I miss calculated on the first one and had to do a small patch).  I put the hot glue on the paper and rolled the cones on to the paper so I wasn't touching the hot glue or the paper with the hot glue on it.  

I hope you try this quick, easy, and inexpensive little craft!  It is sure to add to your holiday fun!!

Saturday, November 30, 2013

Santa Sleds


Candy Santa Sleds

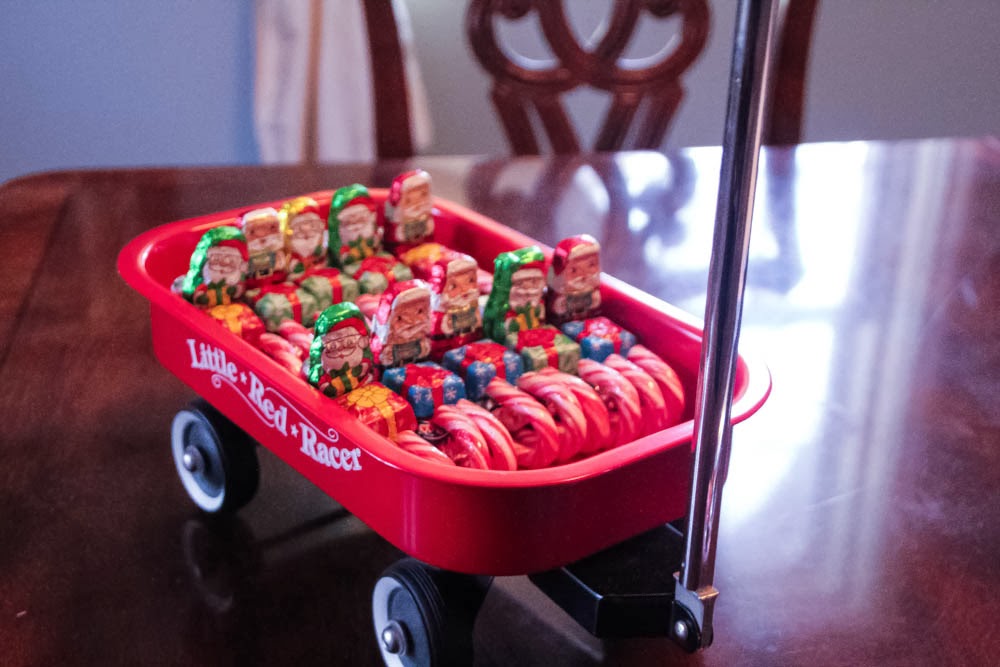
These are so easy to make!  I got fun size 3 Muskateer bars, mini candy canes, chocolates that look like presents, and chocolates that look like Santas.  Then I just hot glued everything together.  Simple!


I have a miniature Radio Flyer wagon that I used for the presentation of these.  They fit perfectly in the wagon!


So cute!

 Just another little treat you can add to your bag of tricks of easy things to make for a crowd.


Monday, November 25, 2013

Christmas Sled

Christmas Sled

I have been wanting to make a decorative sled for a long time now, but I was unable to get a sled for a reasonable price.  That is until I found one on Craig's List for $25!!!  Score!


The rest of my supplies came from the Dollar Tree.  This entire project cost me $33. 

I used 2 wreaths that I put on top of each and I used the wire that is in the branches to wire them to each other.  I used the garland as a substitute for the rope on the sled.


Run, don't walk, to your nearest Dollar Tree and pick up these magnolias!!!  They are on small clips and you can put them anywhere with no glue, no wire, nothing!!!  I used wire for the stars, snowflakes and large balls.  I used 2 rolls fo ribbons to make a bow. 


There is some wire in the edge of the ribbon, so you can curl is and it will hold it's shape.  


I think the wreath itself could be used alone.  I just love it!!

I think I will give the sled a spray of polyurethane once the season is over.  I want to preserve it as best I can.  I have simply wired the wreath and garland on it, so they can be removed and reattached after it is sprayed.