Tuesday, February 25, 2014

Lights, Cameras, Oscars!!!

It's almost Oscars night 2014!!  As we all know, I am a movie freak and this is my favorite night of the year!!!  So, here is my round up of ideas for this year:

First up, a great signature beverage!!!

I found made this one for my friend Nikki's 30th birthday.  It was pink Champagne, Strawberry Vodka and grenadine.  I would not use Strawberry vodka!  It was a little overly sweet.  I would use pink champagne, with regular vodka (1 bottle and 1 cup respectively) and skip the grenadine altogether.  Then I would float some frozen fresh strawberries in it.


Now for an easy appetizer so you can get your winner picks together.


These Caprese Bites come together in a matter of a few minutes.  You marinate the tomatoes ahead of time and then just assemble them right before your guests arrive.

For your "Main Attraction" we have to co-stars.  A beef and a chicken selection.  Each is easy to make and delicious!

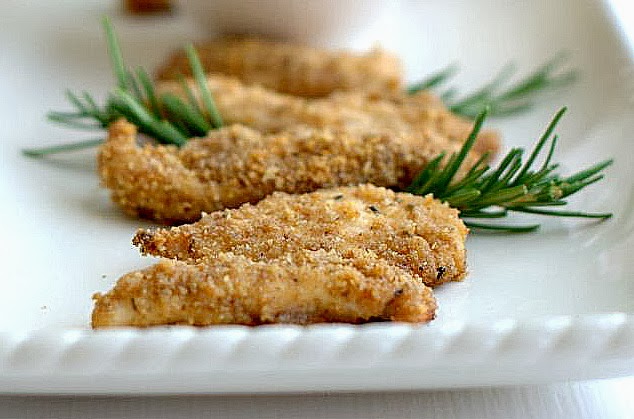
First, the ever popular "Company's Comin' Chicken Fingers".  These are SO good!!!  Just make sure you like the people you are inviting because they will want to come back!


And now, the easiest of them all, the Roast Beef Sliders!  Just get some slider rolls, some thin sliced roast beef deli meat and some horse radish mayo.  Then assemble!  That's it!  Well, except for a nice toothpick. 


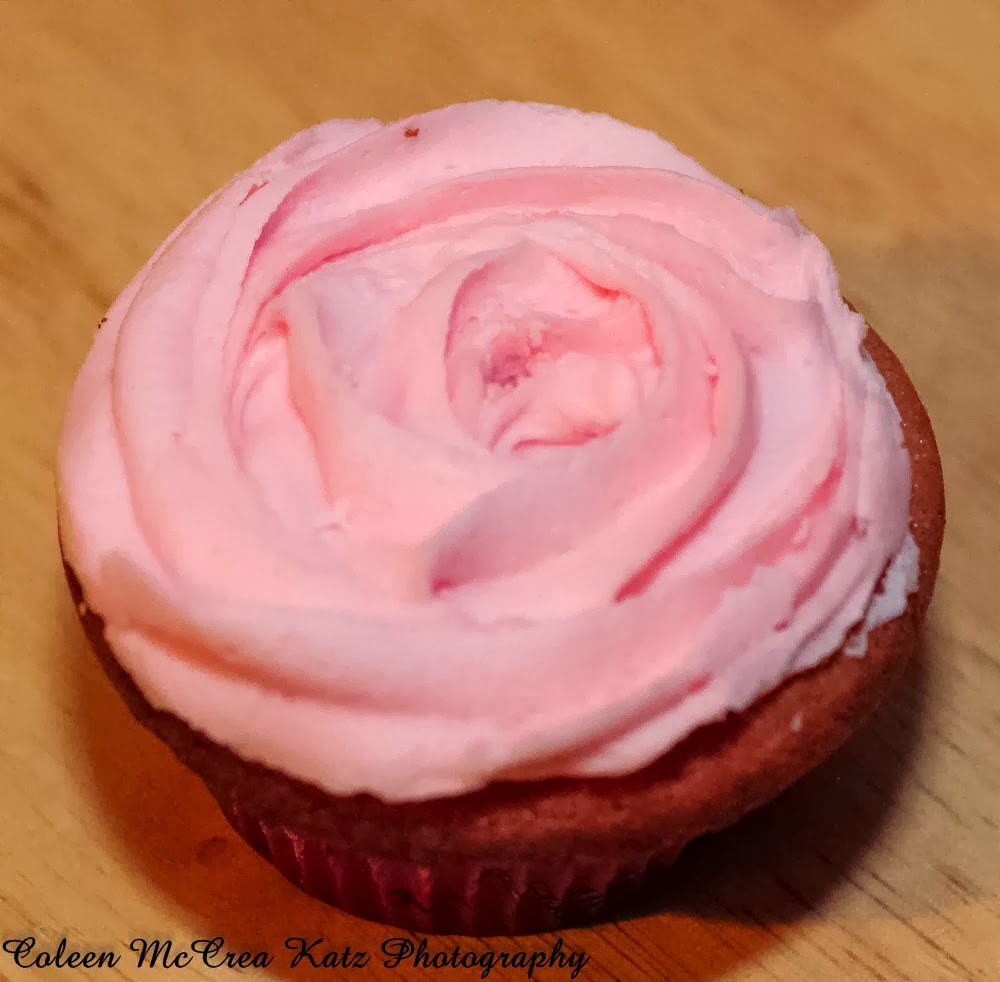
Now for dessert.  Why Pink Champagne Cupcakes with Pink Champagne Icing of course!  What else would you have for a red carpet event?


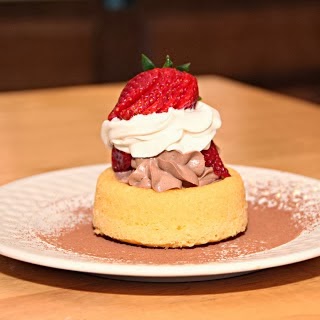
And if you or your guests just must have chocolate (I know I do), here is a great dessert with champagne in it!!!  These Chocolate Champagne Cheesecake Tartlets.  If you can't get the Philadelphia Milk Chocolate Indulgence, add about a half cup of cream cheese and 2 more tablespoons of cocoa powder. 


As for decor, well that's quite simple, go to the dollar store and get some star shaped balloons!


If you are lucky, you will find some great star shaped plates like I did.  If not, go for the gold!  


Make some cool dollar store champagne glasses for your signature drink and you are ready to mark your ballots!!!

Here is a link to a printable ballot and Bingo cards I found on Pinterest!  So fun!!!


I hope you have a wonderful time and pick all of the winners!


Monday, February 17, 2014

Egg Free Chocolate Cupcakes with Whipped Cream Icing

These are decadent little treats reminiscent of Hostess cupcakes.  They are a little dense because there are no eggs in them.  But the whipped cream icing lightens them up!  I made these for a Valentine's dinner for my family since my grandson is allergic to eggs.  That's why there are conversation hearts on one and a heart pick in the other.

Egg Free Chocolate Cupcakes with Whipped Cream Icing

Ingredients:

Cupcakes

(Makes 12 Cupcakes)

1 Cup Sugar
½ Cup Unsalted Butter, Softened
2 tsp. Vanilla Extract
½ tsp. baking soda
¼ tsp. baking powder
¼ tsp. Salt
1 ¾ Cups All Purpose Flour
¼ Cup Cocoa Powder
½ Cup + 3 Tbsp. Sour Cream
½ Cup Milk

Icing

1 Cup Confectioner’s Sugar
2 Cups Heavy Whipping Cream
1 Tbsp. Clear Vanilla Extract

Directions:

Preheat oven to 350 degrees F and line cupcake tin with cupcake liners.
1.    In a large bowl, cream together sugar and butter until fluffy. 
2.    Add eggs, vanilla and almond extracts and mix well.
3.    In a separate bowl, whisk together flour, cocoa powder, baking soda, baking powder, and salt.
4.    Slowly add to vanilla mixture small amounts at a time.
5.    Now add ½ Cup Sour Cream and Milk and mix thoroughly.  Whip on medium speed about 1 to 2 minutes.
6.    Fill cupcake papers 2/3 full.
7.    Bake 15 – 20 minutes or until a toothpick inserted in the center comes out clean. 
8.    Place on a cooling rack for 10 minutes.  Pop cupcakes out of the pan and let them finish cooling on the rack for another 10 minutes. 
  Fill each cupcake liner about 2/3 full using small ice cream scoop.

  Makes about 2 dozen cupcakes.

While waiting for the cupcakes to cool, you can make the icing. 

1.    In a large well-chilled bowl, with a well-chilled beater, place heavy cream.
2.    Add Confectioner’s sugar and vanilla
3.    Whip on high speed for about 5 minutes until stiff peaks form.

4.    Place in a pastry bag fitted with a large star tip and ice cupcakes in a circular motion forming a rosette.

Thursday, February 13, 2014

Lil' Sport

My grandson, Joseph, just got a "big boy" bed.  In fact, he got an entirely new bedroom set and a new room!  We had to make room for his little brother, Nicholas, who will be arriving in April.

Well, Joseph is having some difficulty climbing up in to his new bed.  So, Grammy to the rescue!  I made him this trunk/stool to help out.


The theme of his new room is sports and the color of his new furniture is walnut.  

Here is how I did it.  

Supplies:


1 Wood trunk with a flat top (I picked mine up at Joann's)
2 different types of stains and finishes.  (I used a satin finish and then one with more of a gloss to it)
4 different sports themed wood cut outs (I got the largest ones that Joann's offered)
1 large paint pen (I used white so it would show up well on the dark wood)
A hot glue gun
Rubber Gloves
Paper Towels
Plastic to protect your surface


This is after one coat of the "Restor-A-Finish" in Dark Oak.  It's a nice color, but no shine.  I like to use this first to sort of prime the wood.  The wood absorbs a lot the first coat and this stuff is very fluid.  You want to saturate your paper towel with is in a small spot.  Rub in the direction of the grain of the wood!!!  This is very important.  If you accidentally go against the grain, immediately go back and go with the grain or you will have odd streaks of stain.


This is after one coat of the "Wood-Sheen"  Rubbing Oil Stain and Finish in Walnut.  I think you can get an idea of the difference in the color and see a little bit of the shine.  This is a thicker and gloppier product.  You sort of squirt it on top of the paper towel and squish it around until it absorbs.  I think it's because it has wax in it.  But what a nice finish!


Next I used my hot glue gun to attach the sports balls.  I started on the right with the soccer ball.  That was the flat one, so it was the easiest, and most logical, place to start.  Then I added the basket ball, but I only put hot glue on the edges that would actually make contact with something.  You will have to eyeball this.


Next I added my grandson's name using the paint pen.  I placed a clear ruler on top to use as a guide.  This style of font is called "Tinker Toys" and I have used it for decades.  It's just upper case letters printed and then little circles on the ends of them. The O presents somewhat of an issue so I put it at the top.  The bottom of the O is a little thick because I misjudged where to bring it down to.  Oh well, it looks pretty good.  

Final product:


I think he's going to love it!!!  Plus he can put some treasures in it!


Wednesday, February 12, 2014

Brown Paper Packages

I saw this on Pinterest:


I thought this was a great gift idea!  First, it's an inexpensive and clever way to wrap a gift.  Second, it's reminiscent of one of the greatest movies of all time, "The Sound of Music"!

Here is my interpretation of it:

I know the text is a little hard to read because of the string.  I am guessing that is why the original poster cut theirs in half.  But I like it all on one card. 


I had some red heart doilies, so why not use one for this?  The hearts were easy to add in Print Shop.


Then I put in my hubby's gift and added some goodies on top.  He loves chocolate covered pretzels and Mike and Ike's.  This is sure to be a hit!  So easy to do.

Some double sided tape to attache the doily and the card and tie some twine around the bag.  Doesn't get any easier.  Hope you try it too!

Happy Valentine's Day!!!

Tuesday, February 11, 2014

My Funny Valentine!

It's that time again!  Photo shoot time!  Here are some of my favorites from the Valentine's Day photo shoot I did with my grandson today.


He doesn't usually like stuffed animals, but he really wanted that teddy bear!!!

I just handed him the heart and he did the rest!  No prompting at all!!!

Yeah, he's a natural!!

Monday, February 10, 2014

Winter and Valentine's Mantle

Love is in the air!  And it's on my mantle!!!

I like to decorate for EVERY holiday!  So, it's time to put some love on things.  But I don't want to go completely Pepto on everything.  I want to have a bit that can transition through the whole winter season.

I had some leftover snowflake ornaments that I got at the Dollar Tree along with just a few plastic Christmas balls that were white, pearly, and glittery.  I had 1, just 1, BIG clear plastic snowflake.  I originally bought that for the photo shoot with my grandson.  But I realized that clear was not going to photograph well and I went with the white ones that were just perfect!!!  I also have three large tall clear vases in my closet of things to use for parties and for decor.  I had 3 small boxes with lids that were pink and red.  One of the boxes is heart shaped.  Those were the raw materials for my mantle decor.

Here is what I did with them:


First I filled the glass vase with the snowflakes and the Christmas balls making something reminiscent of the movie Frozen.  Then I propped the large clear snowflake in front of it.


With just the one vase, it really is an impressive statement on the mantle.


Next, I simply added the little boxes turned on their sides.  I wanted the bows on the lids to show.  I think they look adorable!  And, when Valentine's Day is over, they can easily be stored away leaving the vase to last the winter.

Easy, simple, and no glue gun needed!!!


Sunday, February 2, 2014

Pink Parisian Cupcakes

I found this recipe for Pink Champagne Cupcakes on Tattooed Martha's website.  They were perfect for the "Evening In Paris" party theme I was working with last weekend!


I changed up the recipe a little bit, as you will see if you compater Martha's with mine side by side, and I they were a HIT!!!

So, here is my version:


Pink Champagne Cupcakes with Pink Champagne Icing


Ingredients:

Cupcakes
(Makes 12 Cupcakes)

1 Cup Sugar
1 3/4 Cups All Purpose Flour
½ Cup Unsalted Butter, Softened
2 Large Eggs
1 tsp. Clear Vanilla Extract (make sure it’s clear so it doesn’t darken your cupcakes)
1 tsp. Almond Extract
½ tsp. baking soda
¼ tsp. baking powder
¼ tsp. Salt
½ Cup Sour Cream
½ Cup Pink Champagne
3 – 4 Drops of Red Food Coloring (add drop by drop and mix until you get the shade you like, cupcakes will darken while baking)

Icing
½ Cup Unsalted Butter, Softened
5 Cups Powdered Sugar
½ Cup Pink Champagne
1 tsp. Clear Vanilla Extract
1 tsp. Almond Extract
3 – 4 Drops Red Food Coloring (add drop by drop and mix until you get the shad you like)
Edible sugar pearls, sprinkles, or decorative picks (optional)
 

Directions:
Preheat oven to 350 degrees F and line cupcake tin with cupcake liners.
1.     In a large bowl, cream together sugar and butter until fluffy.  

  .   Add eggs, vanilla and almond extracts and mix well.
3.     In a separate bowl, whisk together flour, baking soda, baking powder, and salt. 

4.     In a THIRD bowl whisk together sour cream, champagne, and red food coloring. It should look a little like Pepto-Bismol! 


5.     Slowly add champagne mixture and flour mixture in to sugar and eggs.  Alternate between the flower and the champagne as you are adding it to the butter and sugar mixture and mix slowly so your batter doesn’t get too thick. 

6.     Fill cupcake papers 2/3 full. 

7.     Bake 10 – 15 minutes or until a toothpick inserted in the center comes out clean. 
8.     Place on a cooling rack for 10 minutes.  Pop cupcakes out of the pan and let them finish cooling on the rack for another 10 minutes. 


While waiting for the cupcakes to cool, you can make the icing. 
 . .    In a large bowl, cream together butter and sugar. 
 

2.     Add champagne and mix well. 
3.     Add Vanilla and Almond Extracts and mix.
4.     Add Red food coloring and mix.
5.     Whip on high until very fluffy.

Put in a pastry bag fitted with a large star tip and decorate cupcakes.